Your cart is currently empty!
Fast Tracks Knowledgebase
Questions? Find the answers here
Assembly Fixtures
What is an Assembly Fixture?
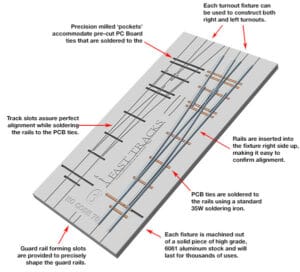
Sometimes called a "jig" or a "template," an Assembly Fixture is a tool that holds rail and PC Board ties in position while they are soldered together to form a turnout 'skeleton' (a basic turnout with just the rail and PC board ties before being completed with additional wood ties).
An interesting bit of information, technically, a "fixture" holds materials while being assembled, a "jig" guides a tool, and a "template" is a drawing used as a guide. This is why our tools are correctly called Assembly Fixtures, PointForm filing jigs, and Printable Tie Templates.
Modelers have built switches by hand for years. Why do we suddenly need an Assembly Fixture to do this?
There are several ways to hand-build trackwork, but we feel the best way to get accurate track is to use a tool that will hold all the parts precisely while being assembled comfortably at a workbench.
- Better Accuracy
- Consistent Results
- No wheel drop through the frog
- Extremely Reliable Operation
- Easier To Build
- NMRA compliant
- Quick
- Unlimited supply of turnouts and track as needed
Are turnouts built with an Assembly Fixture compatible with DCC?
Any switch made with a Fast Tracks Assembly Fixture is 100% compatible with DCC or DC.
What is the projected life span of an Assembly Fixture?
Made from solid aluminum, an Assembly Fixture can construct thousands of switches.
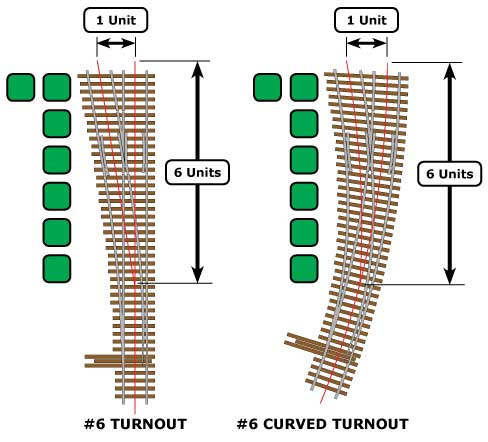
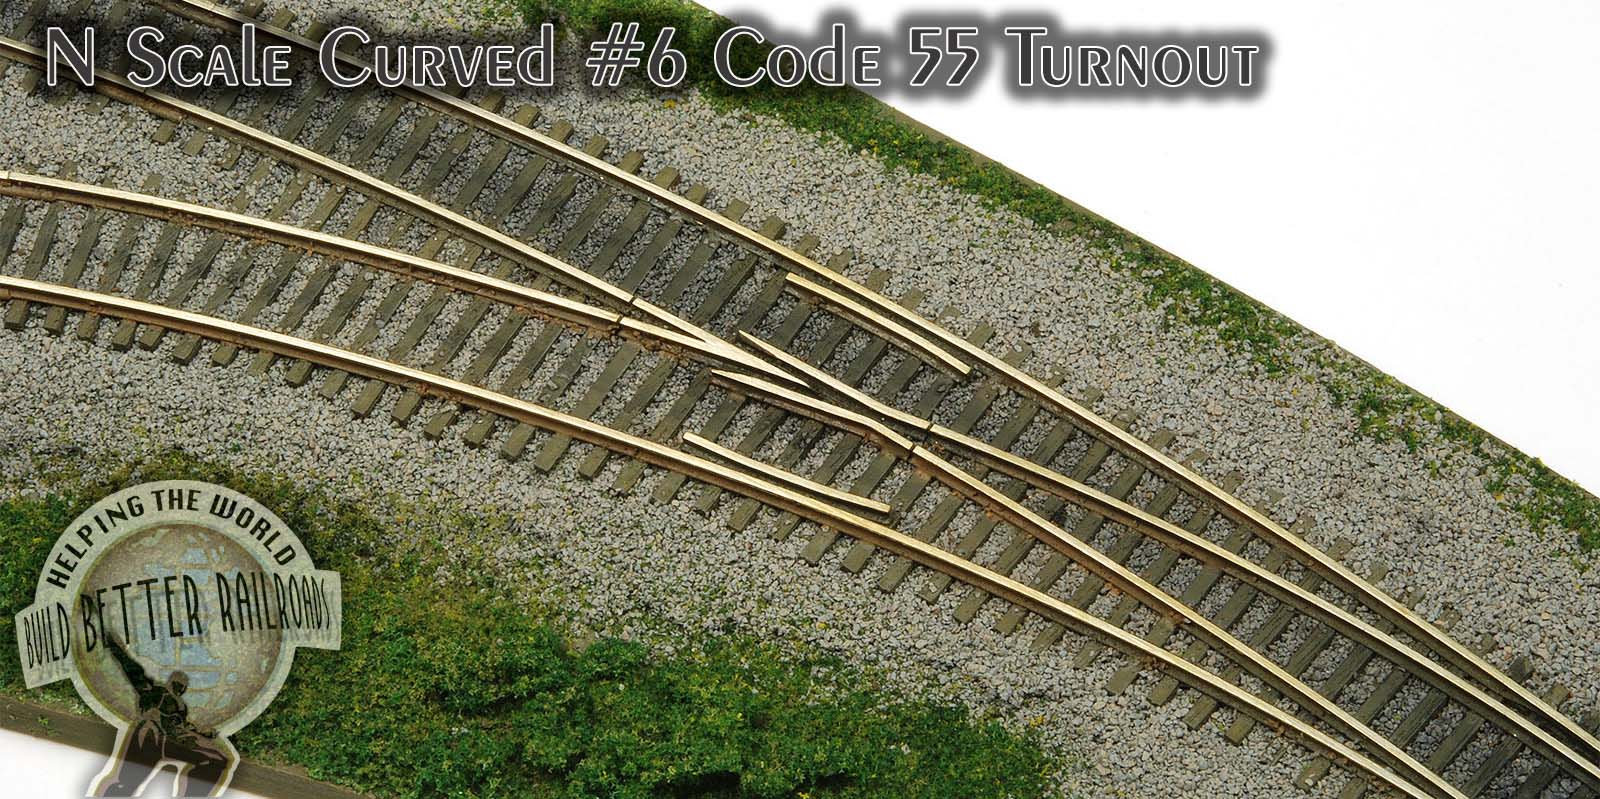
Are curved turnouts numbered differently?
No. The same ratio rules used for straight turnouts apply even if a turnout is curved.
A number #6 curved turnout still has a ratio of 6 to 1 no matter the radius.
Can you make Assembly Fixtures for rail other than Micro Engineering?
While we encourage our customers to use Micro Engineering rail to build switches in our assembly fixtures, our fixtures are compatible with some rail produced by other manufacturers as well. Rail produced by many manufacturers is 100% compatible with Micro Engineering rail and can be used in a fixture cut for Micro Engineering. Below is a table of rail dimensions for various other makes of rail.
How We Measured The Rail
All rail samples were measured using digital calipers or a micrometer and are accurate to within +/-.001".
Measurements were taken from sample rail pieces that we have on hand. All Micro Engineering samples are available as individual lengths of rail. All other sizes were removed from flextrack.
| Manufacturer | Rail Code | Height | Head Width | Base Width |
|---|---|---|---|---|
| Micro Engineering | Code 40 | 0.043 | 0.021 | 0.039 |
| Micro Engineering | Code 55 | 0.056 | 0.027 | 0.055 |
| Micro Engineering | Code 70 | 0.07 | 0.031 | 0.069 |
| Micro Engineering | Code 83 | 0.082 | 0.032 | 0.067 |
| Micro Engineering | Code 100 | 0.1 | 0.04 | 0.08 |
| Micro Engineering | Code 125 | 0.123 | 0.056 | 0.111 |
| Micro Engineering | Code 148 | 0.148 | 0.061 | 0.123 |
| Atlas | Code 55 Super-Flex N Scale | 0.055 | 0.027 | 0.054 |
| Atlas | Code 80 Super-Flex N Scale | 0.078 | 0.025 | 0.053 |
| Atlas | Code 83 Super-Flex | 0.082 | 0.039 | 0.078 |
| Atlas | Code 100 Super-Flex | 0.1 | 0.038 | 0.078 |
| Atlas | Code 148 Custom-Flex | 0.146 | 0.067 | 0.132 |
| Peco | Code 60 | 0.064 | 0.03 | 0.049 |
| Peco | Code 75 | 0.074 | 0.032 | 0.067 |
| Peco | Code 80 | 0.079 | 0.025 | 0.053 |
| Peco | Code 82 | 0.082 | 0.035 | 0.067 |
| Peco | Code 83 IL-115 | 0.082 | 0.032 | 0.067 |
| Peco | Code 100 | 0.1 | 0.041 | 0.086 |
| Shinohara | Code 60 | 0.06 | 0.025 | 0.051 |
| Shinohara | Code 70 | 0.07 | 0.031 | 0.07 |
| Shinohara | Walthers Code 83 | 0.082 | 0.04 | 0.08 |
| Central Valley | Code 81 | 0.081 | 0.034 | 0.068 |
| Right-O-Way | Code 148 | 0.148 | 0.062 | 0.125 |
| Old Pullman | Code 125 | 0.126 | 0.065 | 0.126 |
| S Helper Service | S Scale Rail | 0.136 | 0.047 | 0.106 |
| MTH | Mikes Train House O Scale | 0.19 | 0.09 | 0.192 |
| Roco | Roco Line Code 83 | 0.082 | 0.038 | 0.076 |
| Pilz | Code 83 | 0.08 | 0.032 | 0.067 |
| Tilig | Code 83 | 0.008 | 0.032 | 0.067 |
| C & L | Code 125 | 0.125 | 0.055 | 0.11 |
Can you really use the base of the rail to set the track gauge reliably?
Yes! Rail is formed by drawing it through a forming die, so the base of the rail is as accurate as the head of the rail. Micro Engineering manufactures its rail to a tolerance of +/- .001" at the base. That's 1/4 the thickness of a regular piece of paper!
Do you offer Assembly Fixtures for G scale?
We have had several inquiries about G scale Assembly Fixtures over the years. It is unlikely that using aluminum fixtures with PC Board ties will work for G scale or any scale larger than O.
How heavy are assembly fixtures? What will it cost to have them shipped?
Each fixture weighs between just under 0.5 Lb. to almost 2.5 Lbs. You can determine exact shipping costs by adding the items you want to the shopping cart and then checking the shipping options that apply. This can be done without committing to making a purchase.
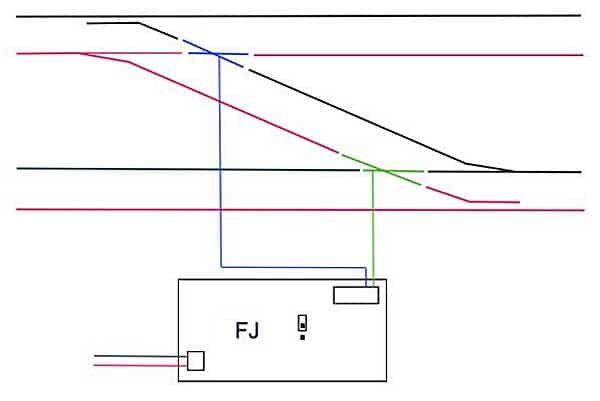
How To Wire A Standard Turnout With A Ground Throw (And How They Work)
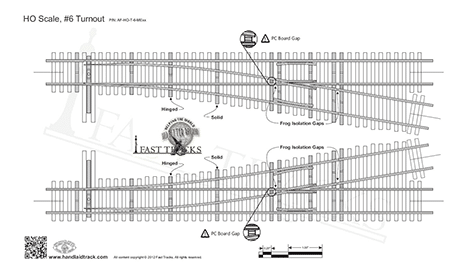
The animated diagram below shows how a standard turnout with rails soldered to PC Board ties and a manual ground throw is wired. The ground throw in this diagram is a Caboose Industries 220S and is available here. Note how the PC Board ties are gapped. These gaps ensure that the rails are correctly isolated. Gap locations are shown on the Fast Tracks printable tie templates for each scale and size of turnout. A turnout wired in this manner is DC and DCC compatible and has a live frog.
How to wire a standard turnout with a Tortoise switch machine
The diagram below shows how a standard turnout and Tortoise switch machine is wired.
I have a Fast Tracks assembly fixture for Micro Engineering code X rail. Can I use this same fixture for brand X rail?
Many Fast Tracks assembly fixtures cut for Micro Engineering rail are 100% compatible with rail from other manufacturers. Here is a list of rail types that we have confirmed are compatible.
| Fixture Cut For | Rail Size | Compatible With |
|---|---|---|
| ME Code 55 | Code 55 | Atlas Code 80 |
| ME Code 55 | Code 55 | Atlas Code 55 |
| ME Code 55 | Code 55 | Peco Code 80 |
| ME Code 70 | Code 70 | ME Code 83 |
| ME Code 70 | Code 70 | Peco Code 83 (IL-115) |
| ME Code 70 | Code 70 | Peco 75 |
| ME Code 70 | Code 70 | Pilz Code 83 |
| ME Code 70 | Code 70 | Tilig 83 |
| ME Code 83 | Code 83 | ME Code 70 |
| ME Code 83 | Code 83 | Peco Code 83 (IL-115) |
| ME Code 83 | Code 83 | Peco 75 |
| ME Code 83 | Code 83 | Pilz Code 83 |
| ME Code 83 | Code 83 | Tilig 83 |
| ME Code 100 | Code 100 | Walthers Code 83 |
| ME Code 100 | Code 100 | Roco Line 83 |
| ME Code 100 | Code 100 | Atlas Code 83 |
| ME Code 100 | Code 100 | Atlas Code 100 |
| ME Code 125 | Code 100 | C & L 125 |
| ME Code 148 | Code 100 | Right-O-Way 148 |
I have a special requirement. Do you make customized fixtures?
We will occasionally take on custom work, depending on our current production workload. Send an email to service@fast-tracks.net with some details of what you are looking for, and we will let you know if we can accept your project.
Note that customized Assembly Fixtures can be costly.
I have heard that code 70 and code 83 can be used in the same fixture, is this true?
The critical dimensions of Micro Engineering code 70 and 83 rail are the same, so both can be used in the same fixture.
The track gauge through the Frog and the guardrails is wider than I prefer, is this normal?
The gauge through the frog and the guardrail is within NMRA standards.
Our interpretation of the NMRA Standards puts the gauge in the middle between the high and low tolerance limits. We believe this will provide the maximum amount of variance with the equipment (wheels) operating through the turnout.
Manufacturers seem to struggle to produce wheelsets consistently in gauge. Our trackwork is likely to perform well with wheelsets slightly out of specification. We recommend that you check and adjust all the equipment intended for use with our trackwork for proper tolerance with an NMRA gauge.
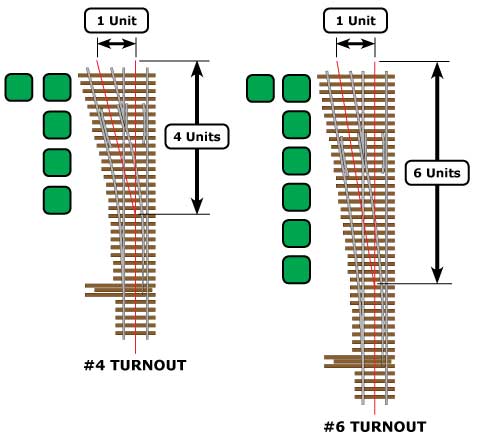
What does the turnout number (I.e. #6 turnout, #8 turnout) stand for?
The turnout number is just a simple ratio that describes the angle of the turnout.
For example, a number #4 turnout has a ratio of 4 to 1, while a #6 turnout has a ratio of 6 to 1. The smaller the ratio, the shorter the turnout, and the tighter the curve will be in the diverging route.
What if the fixture is the wrong size? Can I return it?
Standard fixtures can be returned for exchange or refund if they have been unused. A restocking fee may apply.
For more detail about our returns policy click here.
What is the delivery time for an Assembly Fixture or other tools?
Our delivery time varies depending on what you order, our current production load, available inventory, and the shipping option you choose. We provide a projected lead time for each product that we sell on our website and projected delivery date for most shipping options based on information provided by the carrier.
Contact us at service@fast-tracks.net if you require a more precise lead time estimate for a specific product.
Won't the wheels drop into the frog if there isn't something in place for the wheel flanges to ride on?
No. Wheel drop in the frogs isn't a problem when turnouts or crossings are precisely constructed. As wheel flanges vary in size from one manufacturer to another, it isn't easy to fill in the base of the frog for the flanges to ride on and ensure reliable operation. There will either be clearance under the wheel flange or interference between the bottom of the frog and the flange that the wheel will "bump" when going through the frog, so it is best to leave it empty.
Check out the video to learn more about why Fast Tracks-built turnouts do not have a wheel drop problem.
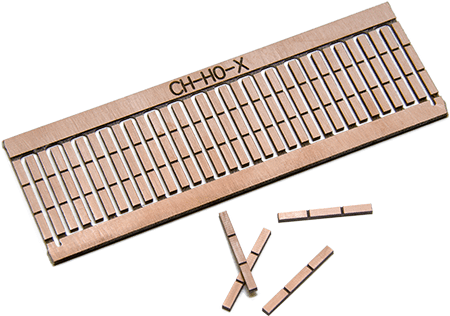
TwistTies Flexible Wood Ties
Can I build straight and curved track with TwistTies?
Yes. We have TwistTie strips available in fixed and flexible versions that make laying wood ties very quick and precise. These are pre-drilled.
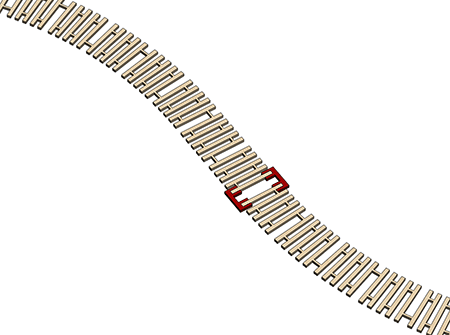
Can I join TwistTies together?
Yes. Our TwistTie strips each include two track joiners that clip onto the edges of the ties, allowing unlimited lengths of TwistTie strips to be connected and curved like a single piece. These joiners can also be used to connect TwistTie strips to turnouts. These joiners are also available separately.
Can I make straight turnouts with TwistTies?
Absolutely! Both straight and curved turnouts can be built using TwistTies.
Can I use a standard PointForm tool for make frog and switchpoints for TwistTies?
Yes. TwistTies use the same geometry as all our turnout designs. The frog number is the same regardless of how the TwistTie is curved.
Do you make N scale TwistTies?
No. As the rail needs to be spiked in place, we have found that the spikes available are too large for anything smaller than HOn3 and will interfere with wheel flanges.
How are TwistTies different from QuickSticks?
QuickSticks are a companion product to trackwork built in the assembly fixtures. Clearance is provided on QuickSticks, where the PC board ties are in place of the wood ties. TwistTies include all the wood ties and are not designed to be used with any PC board ties. Instead, rail is spiked onto the wood ties like traditional hand-laid trackwork.
How thick are TwistTies?
TwistTies are cut from the same material as our laser-cut QuickSticks. The thickness of the wood ties is seven scale inches in standard gauge and five scale inches in narrow gauge.
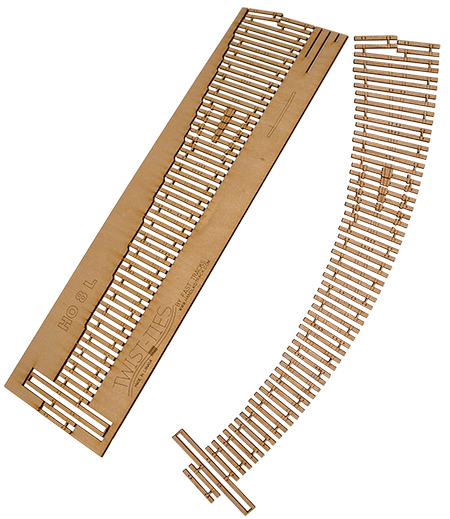
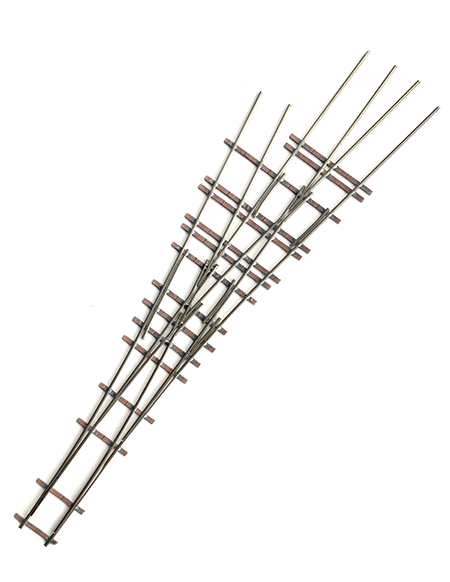
What are TwistTies used for?
We developed TwistTies to build a curved turnout of unknown size. The approach to using TwistTies is closer to traditional handlaid track in that rail is spiked in place onto wood ties. Etched guidelines are engraved onto the surface of the ties to aid in keeping the geometry accurate. Pre-drilled spike holes are provided to also help in rail alignment.
Other than the throwbar tie, no PC board ties are used in a TwistTie built turnout. Rail is spiked by hand in place using pre-drilled holes and guidelines etched onto the surface of the ties. Each TwistTie is available in a left-hand or right-hand version. As assembly requires spiking, these are only available for scales HO and larger, including HO narrow gauge. TwistTies are very flexible and can be curved into any radius but still maintain standard frog geometry. For example, a #8 frog used in a TwistTie can be formed with a #8 PointForm tool regardless of the radii it has been curved into.
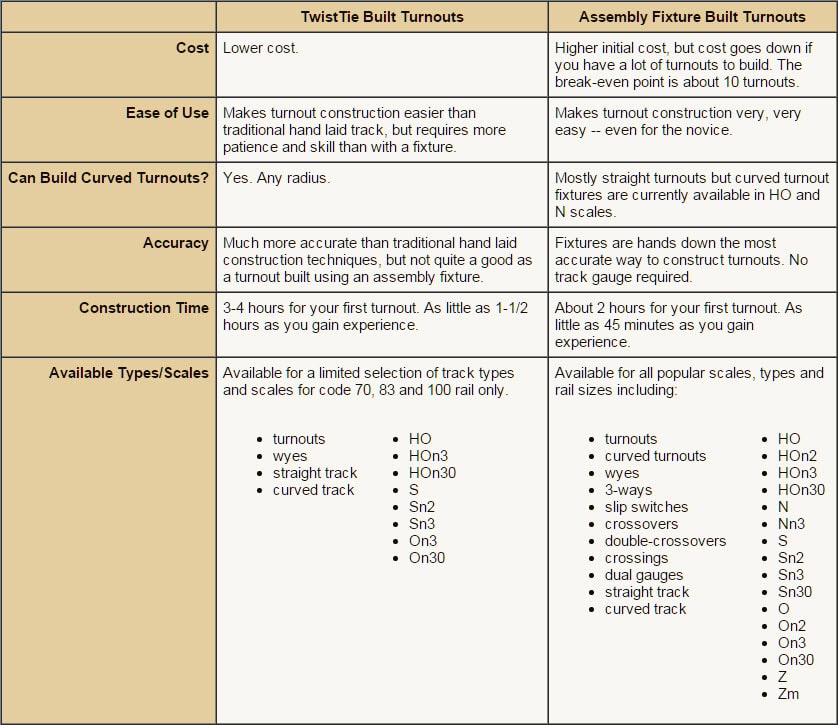
What is the difference between TwistTies or an Assembly Fixture built turnout?
Both TwistTies and Assembly Fixtures are used to construct switches or straight and curved trackwork, but there are some critical differences that you need to consider when deciding which solution to use.
SweepSticks
Creating A "Pseudo" Easement
Adding easements SweepSticks would create a whole new problem as they would be a never-ending design challenge considering all of the different scales, gauges, and radii that we offer.
As an alternative, we suggest creating a "pseudo" easement using SweepSticks with a larger radius or a series of larger radii than the curved track to reach the tangent track.
StockAid Filing Jig
Can't I just clamp the rail in a vise to do the same thing?
You can. Rail can be clamped into the top of a vise on the base to allow the base to be filed. However, this is a very fiddly process. The rail will tend to pop out of the vise, especially smaller sizes. The StockAid tool solves this problem by holding the rail completely inside a groove while being filed.
Do I need a different StockAid tool for each turnout size?
No. StockAid tools are rail size-specific, not scale or even turnout size specific. Only one tool is needed for all sizes and types of switches in any scale, as long as the same rail size is used.
Do I need to purchase a StockAid tool in order to use the Fast Tracks Assembly Fixtures?
No. The use of a StockAid tool is optional. However, removing the base of the stock rail is a tricky task that is made much simpler by the StockAid tool.
How heavy is a StockAid? What will it cost to have one shipped?
Each StockAid tool weighs approximately 1.3 pounds (0.58 kilograms). You can determine exact shipping costs by adding the item to the shopping cart and then checking the shipping options that apply.
My StockAid tool has rust on it. How do I clean it off, and how do I prevent it from rusting again?
The StockAid tool is manufactured from mild hardened steel and has unprotected surfaces that may require maintenance. When you are finished using the tool, you should always put a thin oil coating on the ground surfaces. There is no need to coat any surfaces that are 'blackened'.
If rust has developed on the tool, it can be cleaned off using fine grit emery cloth or sandpaper
What are StockAid tools made from?
StockAid tools are made from case hardened mild steel. We chose to harden the tool to ensure the critical dimensions are maintained during use.
What is the largest-sized rail I can use in the StockAid tool?
We produce StockAid tools for rail sizes up to code 148. Larger rail sizes are impractical in a filing jig like the StockAid tools.
What is the projected life span of the StockAid tool?
Used properly, a single StockAid tool can aid in the construction of several hundred turnouts. One tool should last a lifetime.
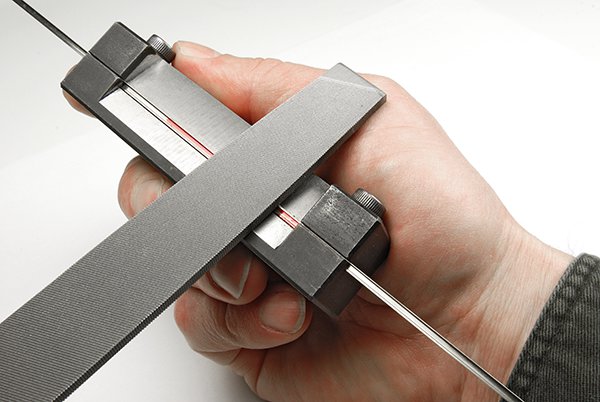
What is the StockAid tool used for?
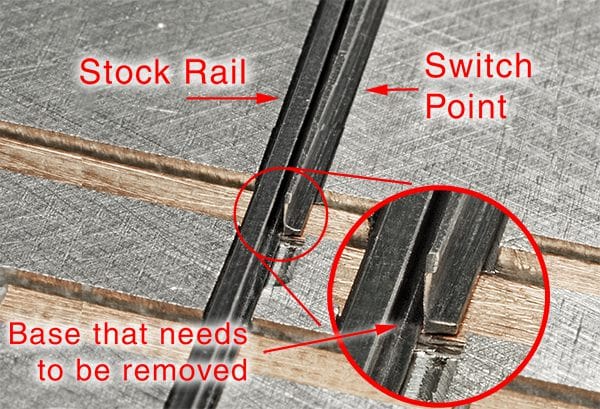
Where the switch points of a turnout meet the outer "stock" rails, some of the base of the stock rail needs to be removed to allow the switch points to close up against it tightly. Removing that tiny bit of base rail can be very challenging by hand. The StockAid tool works as a clamp to hold the rail steady while only exposing a small portion of the rail base. This exposed rail portion is easily filed off by hand, leaving a perfectly formed stock rail.
You used to recommend using a bench top belt sander for removing the base of the stock rail. Why can't I just do it that way?
When we first released our turnout assembly fixtures, we recommended using a small benchtop belt sander to sand off the base of the stock rail. This works well but tends to introduce a lot of heat into the rail, causing it to warp badly.
Filing the rail by hand is more gentle and introduces less stress into the metal. Also, using a StockAid tool is far more precise for this operation.
PointForm Filing Jig
Are PointForm tools scale specific?
No. Each PointForm tool will work with a range of rail sizes. The scale the tool is being used for is irrelevant.
Can I hold the tool in a vise while filing?
Yes, the tool can be handheld while filing or clamped into a vise to allow two hands to guide the file.
Can I use a belt sander to file the points using a PointForm tool?
While it is possible to use a belt sander, we do not recommend it as a power sander will prematurely wear out the tool. A hand file is recommended instead.
Can PointForm tools be used with "Bull Head" rail?
Not really.
The PointForm tool is designed to clamp onto the base of the rail when it is clamped into the tool. Bull Head rail has no base as it is shaped similar to an “I” beam. If the rail is taller than the groove in the PointForm tool, the tool will hold the rail by clamping onto the top of the head and bottom of the foot of the rail.
The height of the groove in the PointForm tool isn’t held to very high tolerance, so we can’t guarantee it will hold the rail. We have had customers successfully shim the groove in the tool with thin brass stock that will allow the rail to be held securely, but this is a workaround and isn’t guaranteed to work.
Do I need to purchase a PointForm tool to use the Fast Tracks Assembly Fixtures?
No. The use of a PointForm tool is optional. However, using it will make it easier to form the frog and switch points and yield more precise results. We do highly recommend getting one to match your assembly fixture.
Do you have PointForm tools for rail larger than code 148?
No. The largest PointForm tool we produce is for code 148. Hand filing rail larger than that is not practical.
How heavy is a PointForm? What will it cost to have one shipped?
Each PointForm tool weighs approximately 1 pound (.45kg). You can determine exact shipping costs by adding the item to the shopping cart and then checking the shipping options that apply.
My PointForm tool has rust on it. How do I clean it off, and how do I prevent it from rusting again?
The PointForm tool is manufactured from mild steel and has unprotected surfaces that require some maintenance. When you are finished using the tool, a thin coat of oil on the ground surfaces will help to prevent rust from forming. There is no need to coat any surfaces that are 'blackened'.
If rust has developed on the tool, it can be cleaned off using fine grit emery cloth or sandpaper.
There are no switch points on a crossing; do I still need a PointForm tool?
Yes. Building crossings require many angles to be formed onto the rail. The crossing PointForm tools will produce the acute and obtuse angles needed to create a properly functioning crossing.
What are PointForm tools made from?
PointForm tools are cut from mild steel and are not hardened. We prefer not to harden the Pointform tools to extend the life of the files used on them and keep the tool's cost down. Used properly, they will last for a lifetime of turnouts.
What is the difference between a PointForm tool for turnouts and one for crossovers, slip switches, three-ways or dual gauge?
To build "special trackwork" such as crossovers, three-way turnouts, slip switches, and dual gauge, additional frog points may be needed at a different angle than the standard size.
These PointForm tools have an additional groove to allow these additional sizes to be formed.
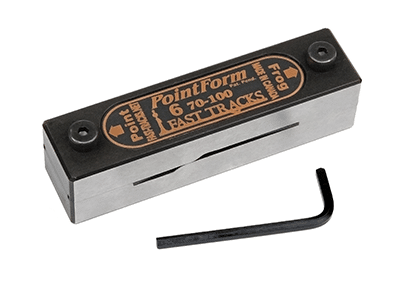
What is the PointForm tool used for?
The PointForm tool is used to hold the rail at an exact angle while being filed to form both Frog Points and Switch Points.
What is the projected life span of the PointForm?
A single PointForm tool can be used to construct hundreds of points. Used with care, they will last a lifetime. Carefully follow our documentation for the PointForm tool to get the most from the tool.
PC Board Ties
Are the PC Board Ties copper plated on both sides of the tie?
Yes. We use double-sided copper material for PC board ties. Our pre-gapped crossties are only gapped on one side.
Can I get pre-gapped ties?
Our Copperhead cross ties are pre-gapped on one side. Two gaps are provided, close to the rail to make them easy to hide. They are available for all the scales and gauges we offer fixtures for.

How thick are your PC board ties?
Depending on the scale, turnout ties are either 1/16" or 1/32" thick. Crossties range from .040" (1mm) to .100" (2.5mm) thick and match the thickness of wood ties.
I have purchased PC Board ties before and they were always twisted. Are yours twisted as well?
No. We machine our PC board ties to shape on a purpose-built machine. Other types of PC board ties available are sheared, which tends to cause the material to twist.
What are CopperHead PC board ties?
Fast Tracks used to produce PC board ties by stamping them on a large press. This worked well but had some drawbacks we didn't like. One was the rough edge created by the stamping process that had to be cleaned up before use. In 2013 we developed a new method of producing PC board ties by routing them to shape with a purpose-built machine. This allowed us to make ties with a nice clean edge that doesn't require any clean-up.
The older stamped type of PC board ties has been discontinued.

What are PC board ties used for?
PC Board ties reinforce switches by soldering them to strategic points along the switch. Usually, only enough PC Board ties are used to provide structural strength. Standard wood ties are used for the remaining ties. Once the trackwork is completed all the ties are painted to blend them together, hiding the PC board ties.
What are PC board ties made from?
PC board, or Printed Circuit board, is a fiberglass substrate with a thin copper laminate. This material is ideally suited for railroad ties as it allows us to solder rail onto the copper surface, providing a solid base for trackwork.
Why are the PC board crossties available at the same thickness as wood ties, but the turnout ties are not?
It isn't necessary to have the turnout PC board ties the same thickness as the wood ties as a fixture built turnout will sit on top of the wood ties. The clearance under the PC board tie is easily hidden when ballasted in place. With cross ties, we have found it works better to have the PC board and wood ties the same thickness.
Won't PC Board Ties be obvious?
No. With proper treatment, PC Board Ties can be made virtually invisible and indistinguishable from wood ties.
Won't the copper delaminate from the fiberglass board?
Not under normal circumstances. When used as shown in our documentation, there are no issues with delamination. Excessive heat and extended dwell time can weaken the adhesive used to laminate the copper to the fiberglass board.
Won't the copper laminate corrode over time?
We recommend painting the finished turnout as soon as possible to prevent any corrosion of the copper ties. If the copper does corrode, it won't affect their performance.
Won't the copper plating cause a dead short?
A thin electrical isolation gap is cut into the copper plating between the rails using a small file to prevent shorting. Our printable tie templates, located on the fixture product pages, show the locations of these gaps.
You used to sell PC board ties in bags of 100, I don't see these now, are they still available?
No. We discontinued individually stamped PC board ties in 2013 and replaced them with the higher quality Copperhead PC board ties we now offer.
Your PC Board Ties don't match the thickness of wood ties. Won't that be a problem?
No. In some scales, the PC Board ties may be thinner than the wood ties, but with a fixture-built turnout, the tie is fastened to the rail and will "float" between the wood ties. The ballast will hide the space under the tie.
QuickSticks Wood Ties
Can I get pre-drilled QuickSticks for N scale?
No. The smallest scale we offer a pre-drilled version for is HOn3. Anything smaller than that and the spike heads become an interference issue. For smaller scales, we recommend only gluing the turnout onto the QuickSticks with Pliobond.
Can I use QuickSticks to construct switches by hand without using your assembly fixture tool?
QuickSticks are designed to work with the Fast Tracks assembly fixture as a quick way to complete a turnout. They aren't designed or intended to work on their own; for this, we'd suggest using our TwistTies.
How are QuickSticks different from TwistTies?
QuickSticks are a companion product to trackwork built in the assembly fixtures. Clearance is provided on QuickSticks, where the PC board ties are in place of the wood ties.
TwistTies, a complete track-building system themselves. Laser-cut from plywood, TwistTies include all the wood ties and are not designed to be used with any PC board ties. Instead, rail is spiked onto the wood ties like traditional hand-laid trackwork.
I don't see left and right hand versions of QuickSticks?
The same QuickStick can be used for right and left-hand turnouts by simply turning it over.
What are QuickSticks made from?
QuickSticks are cut from Baltic birch plywood, specially made in Finland for Fast Tracks.
What are QuickSticks used for?
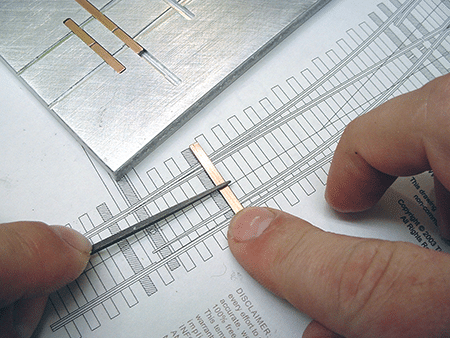
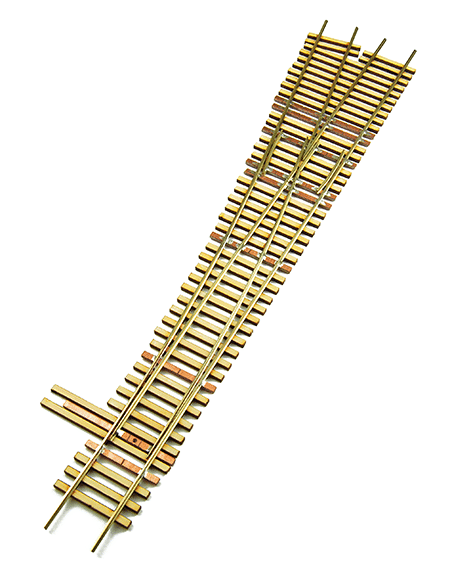
QuickSticks are single assemblies of laser-cut wood ties that make it easy to complete a switch built with the Fast Tracks assembly fixture tool. When a turnout "skeleton" is built in an assembly fixture, the only ties on it will be a few PC board ties at key locations to keep the turnout in gauge. Wood ties need to be added to complete the turnout. The fastest and easiest way of achieving this is to use our pre-cut QuickSticks.
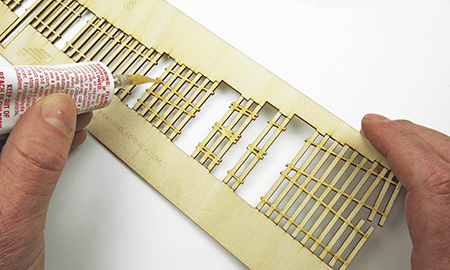
Pliobond is applied to the webs between the ties of a laser-cut QuickStick

Pliobond is also applied to the base of the rail.
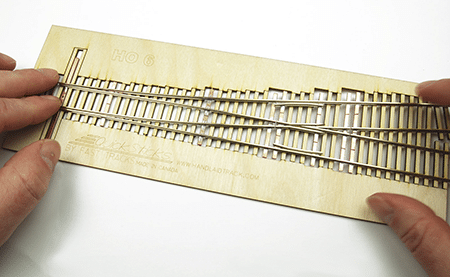
After the adhesive dries a bit, the two pieces are aligned and pressed together.
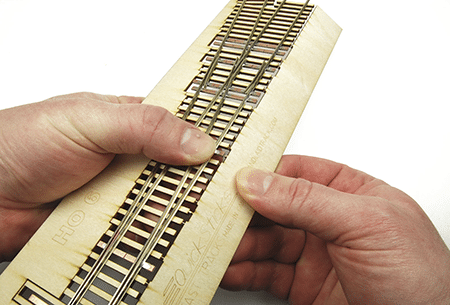
Once cured, the sides of the laser cut QuickSticks are removed, and the turnout is complete.
What is the recommended method for attaching QuickSticks to a fixture-built turnout?
We recommend Pliobond as an adhesive for fastening the turnout to the QuickSticks. We also offer pre-drilled QuickSticks that allow the larger scales (HO and up) to be spiked in place with a minimum of spikes.
We do not recommend using "Walthers GOO" as this adhesive does not properly cure.
Why are the PC board ties thinner than the wood ties on the QuickSticks?
We only produce PC board ties in two thicknesses for turnouts, 1/16" and 1/32". Some scales the wood ties are thicker than the wood ties, but this won't create any issues as the difference in thickness is hidden when the turnout is ballasted in place.
Will the tie height of QuickSticks match my brand of flextrack?
Most of our QuickSticks will match popular RTR track. One exception is N scale Atlas Code 80 flex track, the ties used on this brand are twice the thickness of our N scale QuickSticks. We can produce N scale QuickSticks from thicker material on request. If you are unsure that your brand of flex track won't match, check with us before you order.
Bullfrog Turnout Controls
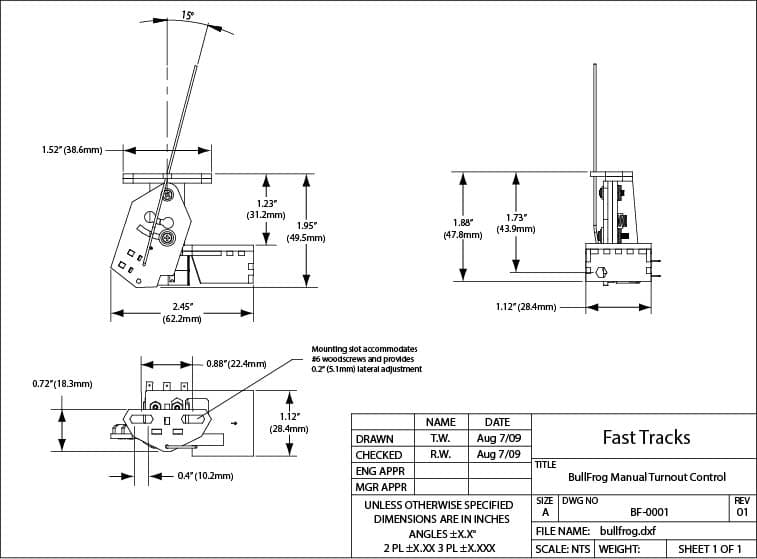
How much space does a BullFrog switch machine need?
It takes about 2" of vertical clearance to fit a BullFrog switch machine. If less space is available, combining the BullFrog switch machine with a SideWinder will allow it to be mounted in as little as 1 1/8" (28.5mm) of space.
What BullFrog components do I need for each turnout?
Each turnout requires a BullFrog Switch Machine Manual Turnout Control and a BullFrog Control Rod Kit, either 18" or 36", depending on how far the BullFrog will be from the control location. If the BullFrog is more than 36" away, you will need additional lengths of Control Rod that come in 18" and 36" sizes.
You may also need a Control Rod Joiner/Hanger Support Kit for long runs of Control Rod to support each control rod joint.
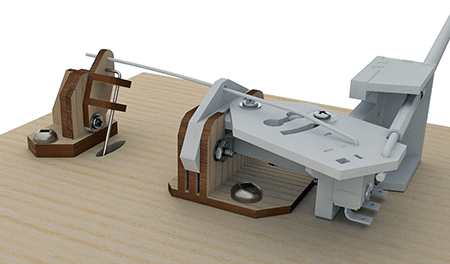
What is a BullFrog Switch Machine?
BullFrog switch machines are used to operate the switch points of a turnout. They are mounted directly below a switch with a small diameter wire driving the switch points above. Made from precisely laser-cut wood parts, they are quickly built in about 20 minutes using simple wood glue.
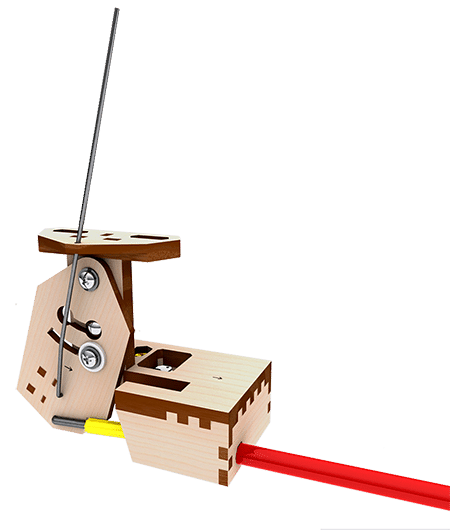
What is a SideWinder?
If vertical space is limited, you can mount a BullFrog switch machine on its side using a SideWinder kit. The SideWinder kit includes all the parts and hardware (not including the BullFrog switch machine) needed to mount the BullFrog horizontally. This arrangement only requires 1 1/8" (28.5mm) vertical clearance to mount the switch machine.
Frog Juicers
Can Frog Juicers be used with the Bullfrog turnout control?
Yes, the BullFrog and Frog Juicers work very well together. Using a Frog Juicer eliminates using the micro-switch on the BullFrog.
Can one output from a Frog Juicer be connected to more than one turnout?
Yes, if you are sure that:
- the frogs will act in concert. If one frog is one polarity, then all other frogs should be the same polarity, as with consecutive frogs in a double-track crossing.
- or - - there will only be a single locomotive on one of the frogs at a time. For example, an industrial spur that a single locomotive will only ever switch.
If two locomotives short a single output by chance, it will shut the booster down, but it won't cause permanent damage.
Can some of the outputs on the Hex Frog Juicer be used to control turnout frogs and others to act as a reversing unit?
Yes. The Hex Frog Juicer has outputs arranged in 2 groups of 2+4. You can use 2 of the outputs as a reverser for a turntable, reverse loop, or wye, and 4 of the outputs to control the polarity of standard frogs.
Can the Hex Frog Juicer change the polarity of a reverse loop? If so, how many reverse loops can a unit handle?
In addition to controlling frog power for turnouts, the Hex Frog Juicer can be used as an automatic reverser for up to three return loops, wyes, and turntables. It can also control opposing frogs found in crossings and simultaneously handle three different crossings.
Two frog outputs must be used for each reverse section to use the Hex Frog Juicer as an automatic reverser. There are two jumper pins for setting up the outputs as three sets of pairs, with each pair, kept opposite in polarity. When a short is detected on one rail in the pair, the polarity of both paired rails automatically changes.
Do all turnouts connected to a Frog Juicer have to be in the same electrical block?
No. Turnouts can be in different blocks. We recommend that you connect the Frog Juicer directly to the command station with no circuit breakers. Essentially a Frog Juicer will form a single block of its own.
Does the frog have to be powered, or does the Frog Juicer provide power as well as polarity control?
The Frog Juicer provides correct polarity power to the frog. Power is supplied to the Frog Juicer from the main bus, which it then uses to power the frog.
How much current (amps) does each Frog Juicer require?
Each Frog Juicer draws about 50mA (0.05 A). The LEDs draw the only significant power. Several people have used the units with N Scale, HO scale, and O scale locomotives with no problems.
If a Frog Juicer is defective, how do I obtain a replacement?
You should contact the manufacturer (Tam Valley Depot) directly at dmcree@tamvalleyrr.com for warranty replacements.
Tam Valley Depot is very responsive to any technical issues.
Is there a Frog Juicer available to control “live” frogs?
The Frog Juicer was developed to only work with isolated frogs. However, several users have used the Frog Juicer with live frogs by making the following simple modification.
- Paint the inside of the rails where the points contact them to insulate the points from the rails.
- Attach an output from the Frog Juicer to the frog section.
Isolating the points from the rails will eliminate simultaneous shorts that will prevent the DCC booster from starting up when it is turned on.
Is there a Frog Juicer wiring diagram for a crossing?
Wiring a crossing for automatic polarity control requires 2 Frog Juicer circuits. (Two single Frog Juicers, one dual Frog Juicer, or two circuits from a Hex Frog Juicer.)
Two of the frogs diagonally across from each other can be un-gapped. The other two frogs need to be gapped and the polarity controlled with each frog connected to its own auto-reverser circuit.
Is there a wiring diagram for a 3-Way turnout with a Frog Juicer?
Wiring 3-Way turnouts is just a simple matter of attaching the two frogs to two Frog Juicers. 2 Singles, 1 Dual, or two outputs from a Hex Frog Juicer.

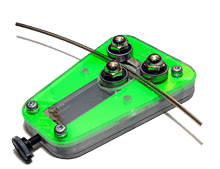
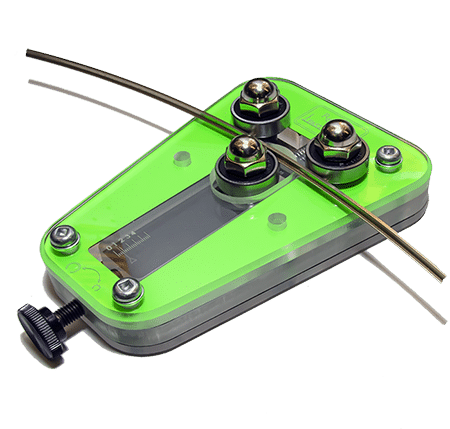
What is a Frog Juicer?
A Frog Juicer is a small electronic circuit that will automatically switch the polarity of a powered frog in a turnout. It can detect the presence of a locomotive on the frog, and if the polarity of the frog is the opposite of the locomotive, it will switch it to match. It does this at an undetectable speed without causing the engine to stall or the sound to be interrupted.
What is the difference between a Hex Frog Juicer, a Dual Frog Juicer and a Mono Frog Juicer?
A Hex Frog Juicer can control up to 6 turnout frogs or three reverse loops or wyes. They are also the best option for wiring a double crossover. A Dual Frog Juicer can control two turnout frogs or a single reverse loop or wye. They are also suitable for operating the frogs of a crossing. A Mono Frog Juicer will control a single turnout frog.
What is the maximum distance allowed between a Frog Juicer and the turnout frog?
The recommended wire sizes and maximum distances to the frog from a Frog Juicer are here.
| AWG Size | Max Distance |
|---|---|
| 30 | 2' (0.6m) |
| 26 | 5' (1.5m) |
| 24 | 8' (2.4m) |
| 22 | 12' (3.6m) |
| 18 | 32' (9.7m) |
Note: Heavier wire is not necessarily better as it can cause problems with the booster or circuit breaker detecting the short before the Frog Juicer does.
#22 AWG wire or larger is recommended for the Frog Juicer.
What is the warranty for the Frog Juicer?
Every Frog Juicer comes with a 30-day money-back guarantee and is covered by a one-year warranty against defects in manufacture or failure due to no fault of the user.
When using a DigiTrax BDL168 how should the Frog Juicer be connected?
We recommended that you connect the Frog Juicer directly to the booster. You will be unable to detect trains on the short length of the frog, but this will prevent false detections, which would be a more significant issue.
When using the Hex Frog Juicer for large scales will the 2 amp power limitation create a problem?
The Hex Frog Juicer will work fine with O scale locomotives. The Hex Frog Juicer only provides power to one wheelset at a time when crossing frogs. DCC-equipped O scale locomotives draw 2+ amps only when the wheels are slipping.
It might not be a good idea to use the Hex Frog Juicer as an auto-reverse if you run a consist over the reversing section with several locomotives on the track section at once.
Which brands of turnouts will work with a Frog Juicer?
| Brand | HFJ Compatible | Notes |
|---|---|---|
| American Flyer | No | |
| Atlas | Yes | If the frog is metal (Custom Line). Not if the frog is plastic. |
| Fast Tracks | Yes | |
| Marklin | X | Not tested. |
| Micro Engineering | Yes | |
| Peco Electro-Frog | Yes | As long as the wire jumpers to the frog are cut and are attached to the Hex Frog Juicer. |
| Peco Insulated Frog | No | |
| Shinohara Electro-Frog | Yes | As long as the wires to the frog are cut. |
| Shinohara Insulated Frog | Yes | |
| Walthers | Yes | As long as the wires to the frog are cut. |
Will the Frog Juicer be available with more than 6 outputs?
Not likely, as the microprocessor can only handle six outputs.
Will the Hex Frog Juicer work correctly on a 3-Way stub turnout with three frogs?
Yes. All frog Juicers will work with a stub 3-way turnout.
Will the Hex Frog Juicer work the PECO SL-E394F electro-frog crossing?
No, The PECO SL-E394F uses plastic frogs. The Hex Frog Juicer requires metal frogs.
Will the Hex Frog Juicer work with a double crossover comprised of 4 Atlas turnouts?
Yes, As long as the frogs are isolated, made from metal, and you are using DCC, the Hex Frog Juicer should work fine with a double crossover.
Will the Hex Frog Juicer work with DC input?
No. The Hex Frog Juicer only works with DCC systems. It was explicitly designed to utilize the constant alternating voltage DCC systems applied to the rails.
Will the Hex Frog Juicer work with other factory-made turnouts?
As long as the turnout uses an electrically isolated metal frog, a Hex Frog Juicer will work fine. Frog Juicers only work on layouts using DCC.
Will turnout controls such as ground throws or switch machines affect the function of the Hex Frog Juicer?
No. The Frog Juicer works independently from the turnout control. The only electrical connection to the frog should be from the Frog Juicer.
Frog Juicer Troubleshooting
Suppose some of the outputs of the Frog Juicer are used as an auto-reverser, and other outputs are used to control frog power. Will there be a problem with a multiple unit locomotive clearing the turnout before the reverse section is entered?
Symptoms
For example, there is a crossing on one end of a turnout and less than 12 inches from the other end of the same turnout to the isolation gaps for the reversing section. The crossing and the turnout are located within the reversing section, so a multiple unit locomotive can start continuously switching polarity as it crosses the frog while in the auto-reversing section. Will this damage the Frog Juicer?
Diagnoses & Solution
No. The Frog Juicer will not be harmed and will continue to work with no problems.
The Frog Juicer seems to be causing a "pop" sound for sound equipped engines when the wheels bridge the isolation gap.
Symptoms
The Frog Juicer functions perfectly when running analog engines or non-sound decoder-equipped engines. Still, there is a very slight "pop" sound when wheels bridge the isolation gap at the frog of a turnout for sound-equipped engines, which is probably the sound of a short circuit. Is this caused by the higher current draw of sound decoders such as the Soundtraxx Tsunami and regular DSD decoders?
Diagnoses & Solution
Possibly. Try placing a 0.2 ohm 1/2W resistor between the frog and the Frog Juicer. This should slow the inrush current sufficiently to let the Frog Juicer react but not cause enough voltage drop to affect the locomotives or sound units.
There seems to be an intermittent short circuit that results in the DCC system shutting down.
Symptoms
When a Frog Juicer is activated, the LEDs change color, and the turnouts seem to be functioning perfectly, but then an intermittent short circuit occurs that results in the DCC system shutting down. If the power to the Frog Juicer is disconnected, the DCC system re-activates, and when power to the Frog Juicer is re-connected, it functions properly for a while, but then it fails again. Could the Frog Juicer be defective?
Diagnoses & Solution
While the Frog Juicer may be defective, it is more likely that there is a wiring or frog isolation problem.
A simple test is to disconnect each frog one at a time from the Frog Juicer and re-test the functionality until the problem no longer occurs. This will narrow down the issue to a specific frog. Once you have found the frog that is causing the problem, swap the output of the problem frog with the output to a frog that is working correctly. If the issue disappears, then the Frog Juicer is likely at fault.
If the problem still occurs, check to ensure that the frog is fully isolated.
Sometimes putting a 0.2 ohm, 1/2W resistor between the Frog Juicer and the frog will also solve problems. You can use a 24" (61cm) length of 30ga wire to replace the resistor.
Rail Roller
Can I use the Rail Roller with girder rail or bullhead rail?
Yes, the RailRoller will work with all types of rail. They will not work with flextrack.
Is the Rail Roller pre-calibrated to produce different radiuses?
No. Since the Rail Roller can be used for any scale, there are too many combinations to reliably pre-calibrate the tool. You will quickly find this isn't necessary anyways as the tool is straightforward to adjust and use.
Is the RailRoller tool as awesome as it looks?
Absolutely.
What is the Rail Roller used for?
The RailRoller creates smooth curves in code 40-148 rail. It can also be used to straighten pre-bent or misshapen rail.
What is the smallest radius that the Rail Roller can create?
As small as 2".
They work well for forming the ring rail of a turnout table pit as this rail needs to be of a very consistent radius.
What size rail will the RailRoller work with?
Code 40 through code 148.
Printable Track Templates
Can I get a single page version of a template?
The Printable Tie Templates were created in a series of projects over the years, and some are newer versions than others. The latest versions will usually have a single-page version available to fit standard paper sizes.
The largest paper size we produce templates for is 11"x17" (A3 paper = 297 x 420 millimeters)
Can I use your Tie Templates to hand lay my trackwork even if I don't use your assembly fixtures?
Sure! It will take longer and may not be as accurate. Don’t rely on the printed template for the gauging of the rails, use a track gauge.
How accurate are your Tie Templates?
Our Tie Templates are all drawn to NMRA standards as far as track gauge and radii are concerned. The shape and dimensions of guard and wing rails were produced using NMRA Recommended Practices.
Our Printable Tie Templates are not intended as a substitute for our assembly fixtures as the rails' location for some sizes is for reference only and may not be accurate.
How do I use Tie Templates with my Fast Tracks turnouts?
Printable Tie Templates can be used for laying out a model railroad to ensure the trackwork will fit as expected and for laying out individual wood ties if our laser cut QuickSticks are not used.
For complete details on using the Fast Tracks Track Templates, check out the Trackwork Builders Guides.
Is there a way to print just the switch part of a printable template? All that other gobbledygook is using up all my ink!
Yes, there is a lot of additional information on the tie templates that don't need to be printed. So here is a way just to print the switch portion of the tie template.
- Ensure you have the latest Adobe Reader. You can download the latest version here.
- Open the template in Adobe.
- Click on the Magnifying glass icon at the top of the screen. If you don't see the magnifying glass icon, right-click and select Marquee Zoom.
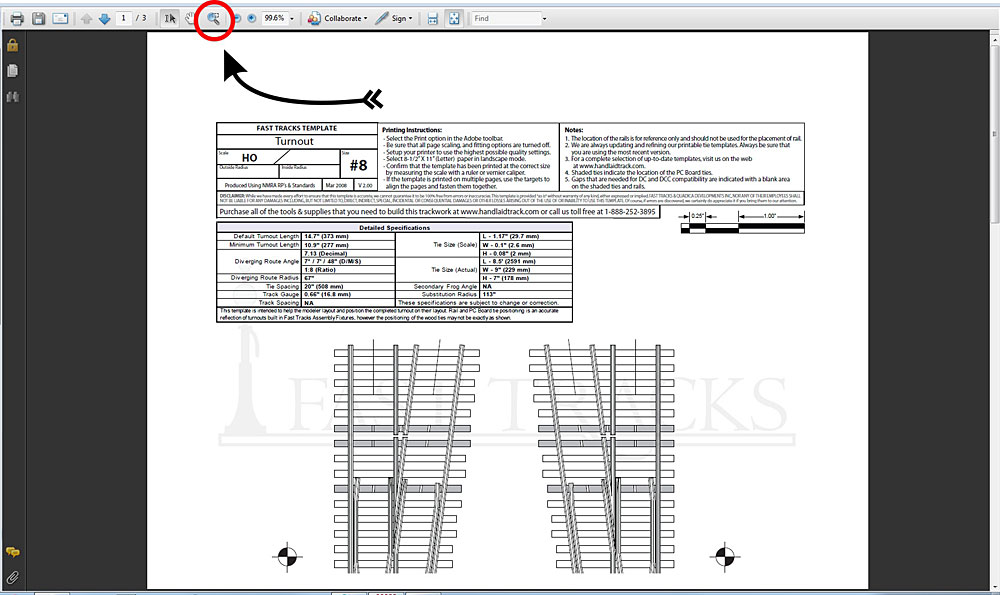
- Draw a box around the part of the tie template you want to print. If it is a multi-page template, be sure to include the targets used to align the pages after.
- Click on the Print icon on the top left-hand side of the page. Select Current View in the Print Page section when the print options dialog box opens. (Shown in image three next to the 1.)
- Select None on the Page Scaling drop-down list from the Page Handling section as shown in image three next to line 2. This is very important. Otherwise, the printed turnout will not be full size.
- Draw a box around the portion of the tie template you want to print. If it is a multi-page template, be sure to include the targets used to align the pages after.

- Click on OK to send the image to the printer. Repeat steps 3 through 7 for each page of the template.
What are Tie Templates used for?
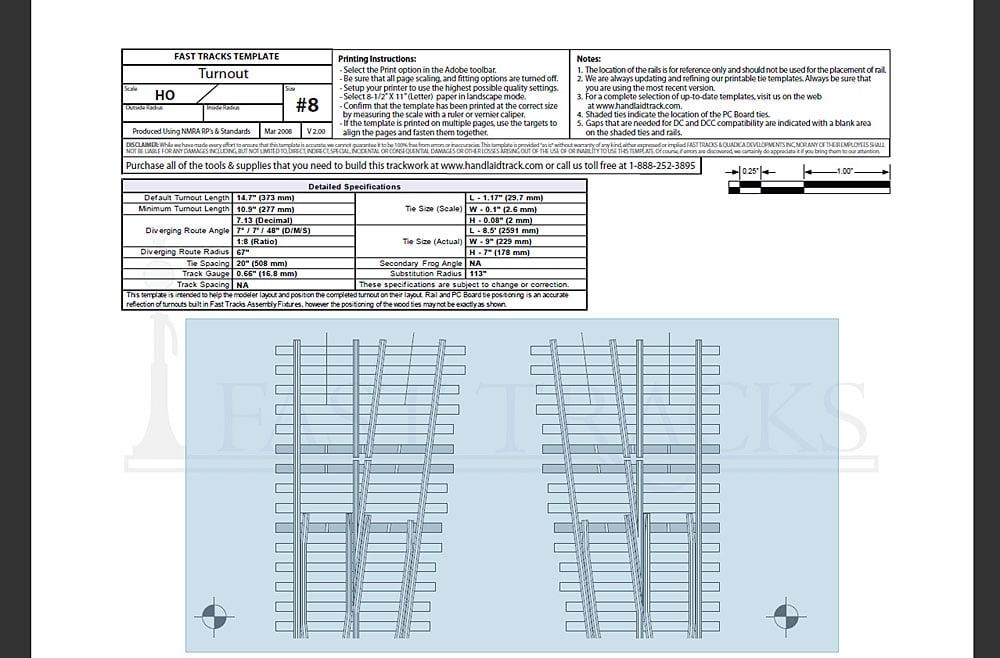
Fast Tracks Printable Tie Templates have been created to help the modeler locate ties for trackwork built using a Fast Tracks assembly fixture. Our Track Templates will match switches built using Fast Tracks Assembly Fixtures precisely and can also be used to help position and layout track on your roadbed.
Printable Tie Templates are available to match most of the fixtures Fast Tracks offers and can be downloaded for free from the website. Some are available as a single sheet print, while others require multiple sheets to be printed and joined together.
What dimensions have you used to lay out the ties?
Every railroad and modeler seems to use different standards when laying out the locations of ties in a turnout. So rather than trying to match any one railroad, we decided to use "typical" dimensions and just what "looks right."
Ties for standard gauge turnouts are spaced 20" apart and are scaled 9" wide. Narrow gauge ties are typically spaced 22" apart and are scaled 7" wide. However, there are some exceptions where the spacing between ties can range from 21" to 25", and the ties can range from 5" to 9" wide. It's best to check the specifications on our website for each particular narrow-gauge fixture.
The spacing of the ties is consistent throughout the turnout.
Why are there no Tie Templates for straight and curved track?
Joining together sections of printed curved track and keeping the radius accurate would be almost impossible. Even the slightest misalignment of the individual sheets would lead to significant accuracy issues.
Why isn't the template printing out the right size?
It is essential to turn off any "fit to page" or "image scaling" in the printer settings; otherwise, the template will not print out full size. To confirm it is printing full size, we have included a scale on each page that will measure exactly 1" (25.4mm). Use this to verify that it has been successfully printed correctly.
We highly recommend downloading and printing with Adobe Reader, as this will give you several printing options to ensure it is printing correctly. The most recent version of Adobe Reader can be downloaded here...
Will the gaping shown on the Tie Templates work with DCC?
The rail gapping shown is for DCC turnouts, as well as DC. This will isolate the frog completely from the turnout and can be left un-powered but may cause some stalling on locomotives with short wheelbases.
Alternatively, you can power them from a relay, switch machine contacts, or the Hex Frog Juicer, which we strongly recommend. The gaps in the PC board ties shown on the templates must be there to prevent shorting in DC and DCC.
Will your Tie Templates match commercial trackwork?
Possibly. Fast Tracks Track Templates have been designed to match the tie placements produced with the Fast Tracks fixtures and will probably not match the tie patterns of commercial turnouts. The location of the rails will probably match commercial turnouts providing they are made to NMRA standards. The centerlines will be the same.
To accurately match a commercial turnout, simply photocopy the full turnout size.
Getting Started Videos
Soldering Basics
Tim Warris demonstrates basic soldering techniques and provides information about the tools and supplies you will need for soldering trackwork, how to take care of your tools and how to get the most out of them.
Soldering Trackwork Using Acid Based Flux
Tim demonstrates how to solder trackwork in a Fast Tracks assembly fixture using acid-based solder flux and small diameter solder with a 35-watt pencil tip soldering iron. Watch the entire video for valuable tips to ensure soldering success.
Gift Cards
Do Gift Cards Expire?
No. Fast Tracks gift cards never expire.
How To Use Gift Cards
- Add items that you want to order to the cart.
- Start the checkout process.
- On the checkout page you will see section in the payment options box with the title Have a gift card?
- Enter your Gift Card into the box and your card will be applied to your order total.
Note that the entire gift card balance will be applied to your order total. You cannot apply just part of the gift card value to your order.
If the value of the gift card value is greater than your order total, then card will be used to pay the total order amount. Any remaining balance on the gift card can be used for future orders.
You can check the current balance of any Gift Card here.
Fast Tracks WayPoints
What happened to the Fast Tracks Waypoints Program?
After 13 years of rewarding our customers with the Fast Tracks WayPoints program, we decided to wind it down on June 15, 2023.
Any points that you had accumulated were converted into a non-expiring gift card. You can use this gift card for any purchase on the Fast Tracks website. You should have received an email detailing your WayPoints balance and new Gift Card code. Please contact us if you did not receive this notification email.
While the WayPoints program has ended, our commitment to rewarding our customers has not. To provide all of our customers with the with the best possible prices and discounts on every order we are excited to introduce our new order volume discount program. It’s simple. The more you add to your cart, the greater the discount you’ll receive on your order! You will find complete details about our new discount program here.

